
Digital scales are standard in our daily lives, from any grocery store in the product section to our own home. There are different types of digital weighing scales available in the market like bench scale, kitchen scale, floor scale, industrial scale, bagging scale, etc. and these are used to weigh heavy objects.
If you want to build your digital scale, it’s surprisingly easy nowadays as you only need essential commonly available components. But you might have never seen any digital scale from inside and not knowing how they work.
So, if you wish to build your own digital weighing scale or incorporate a weighing function, we have discussed the step-by-step DIY guide to building a digital weighing scale at home.
Let’s roll down!
What is Digital Weighing Scale?
One of the most accurate analog instruments is a digital scale that uses force sensors to measure the load of a thing. It is also used in a massive amount of applications ranging from sale stores to industrial measurement equipment or home things.
Also, it displays the weight as numbers and digits using a Weighing Indicators panel. These weight indicators can be combined with a range of scales and software for a complete weighing solution. In addition to measuring the weight, the force sensor can also be used as a dynamometer to measure the force in newtons.
So here is the exact mechanism of the digital scale and we have tried to explain it in the simplest way possible:
- First, you should know that there is a load cell inside the digital scale which is an assembly of four strain gauges which is arranged to represent a wheat stone bridge format to measure an unknown electrical resistance.
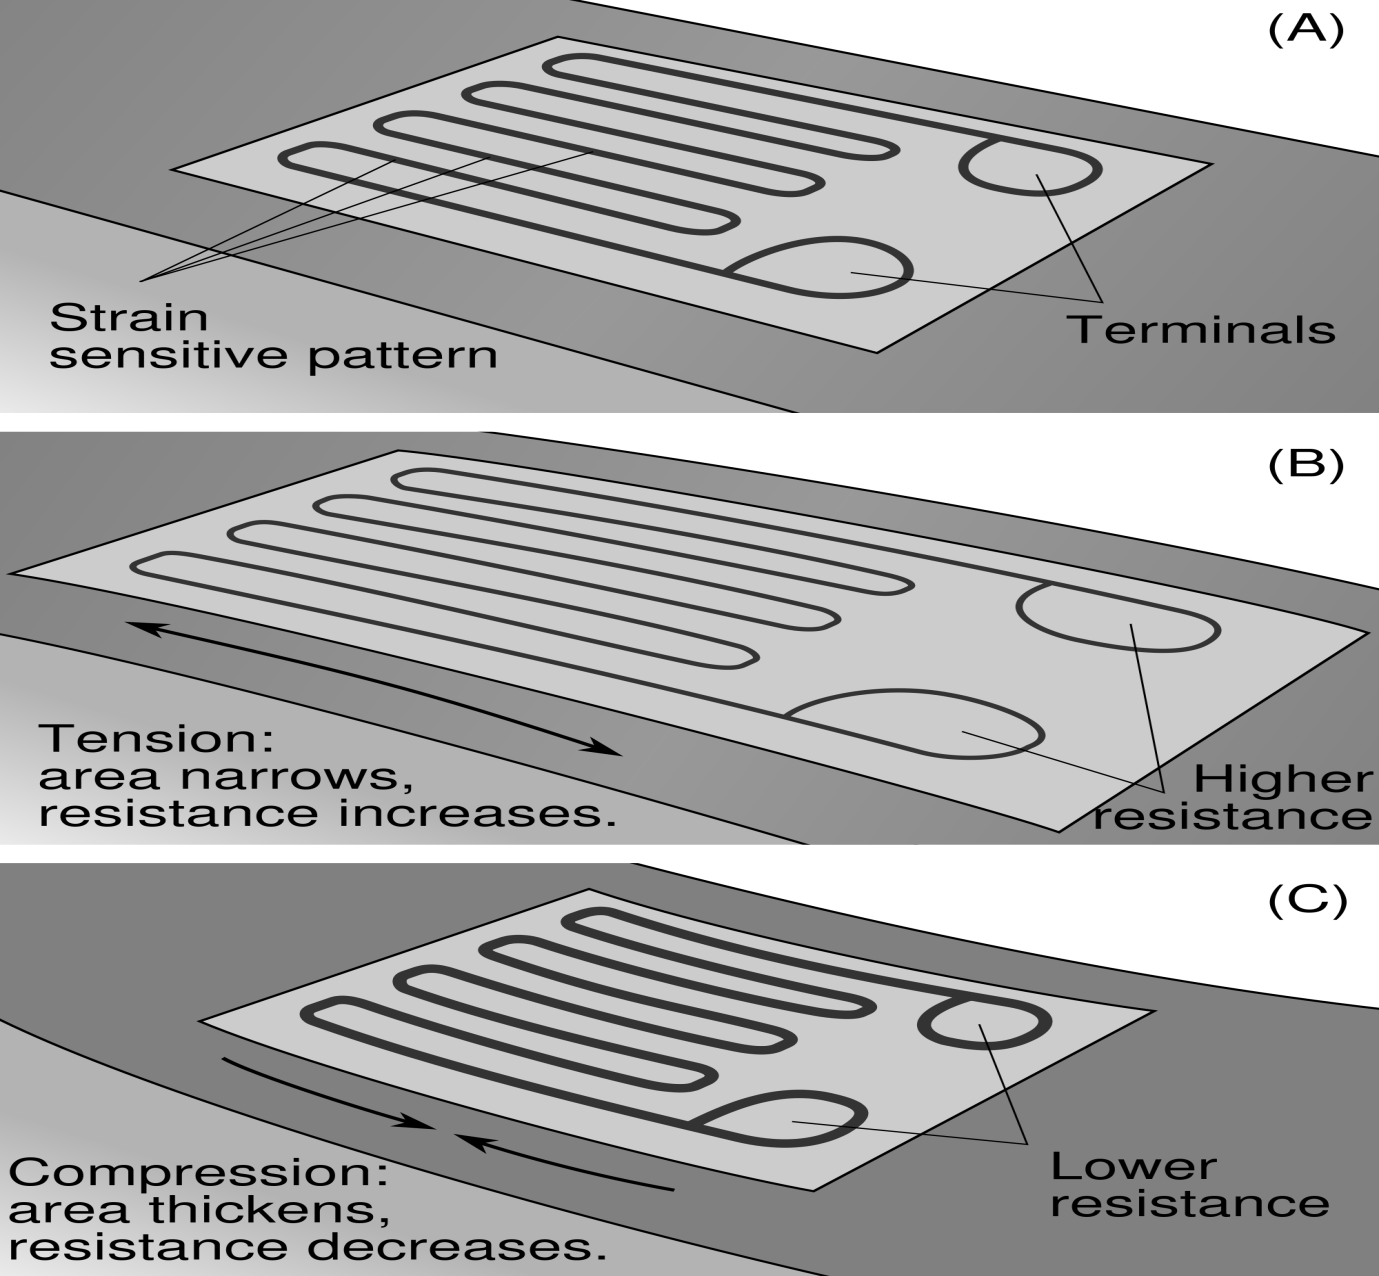
- Strain gauges are the devices present in the inside of a digital weighing machine which has the different property of adjusting their resistance when a force exterior is applied. An external force is nothing but the power we exert when we stand on the digital scale.
- A connection is made to the load cell and an amplifier, and when an external force is exerted, strain gauges adjust their electrical resistance. Then this resistance generates an output and augmented by the HX711 amplifier.
- Then a digital filter is used to sift the output thus produced after the amplifier has done its work.
- After filtration, the output is sent to ADC in the analog form so that it can be converted from analog to digital format on Weighing Indicators, which makes it easier for the user to read as well as display and manage the weight data detected by the scale platform. This indicator is designed for various weighing applications to increase the visibility of its data and gain maximum efficiency.
- One thing to note about this is that a digital scale operates on batteries. The most used batteries are AAA batteries. Everything is electronic, and the batteries, therefore, supply current throughout the circuit, which helps the load cell to do its job.
So that was the basic concept of the mechanism of a digital weighing machine.
Step-by-step Guide
Step 1 Get the basic components
- Load cell
Choose your load cells as per your requirement as all scales are built around a 4 or 3-terminal load cells. The result depends on the type of scales you want to create. They’re all electrically compatible and cheap enough so you can change your mind later, or get more than one type to experiment with.
- The signal conditioner
- Microcontroller
- Connecting wires
- Weighing Indicators (Display)
- Cardboard, bottle caps, switches and some bolts
The most important parameters to consider when designing a balance system are ADC dynamic, internal counting, range, noise-free resolution, system gain, update rate, and drift.
Also, for best performance, it is critical to focus on design consideration like ratio-metric design, layout, hardware and software.
Step 2: Prepare a base
A base is also required to secure the load cell to it using nuts and bolts. You can use cardboard or hard plywood for the frame to place objects on a base. This step is necessary because the entire load cell bends slightly when a weight is placed on it, so it must be kept horizontally while measuring.
Step 3: Coupling the components and set up the load cell
Also, use the following components, coupled together:
- A load cell
- HX711 amplifier
- Arduino Uno microcontroller unit
- Any suitable output screen
Also, check the arrow on the force sensor. It tells the direction in which you should apply force. You can assemble the load cell using metal strips. Simply attach the metal strip to the load cell using bolts.
Step 4: Hardware Configuration
The load cell has four wires, and they are as follows:
- The red wire is the positive output
- The white wire is the mass of the output
- The black wire is the positive output
- The green wire is the negative output
- Any additional wire of any color like blue or yellow is the ground wire. That wire must be connected to the ground of the power supply.
Also, note that the wiring illustration depends on the technical sheet of the load cell purchased. Therefore, the colors listed above may correspond differently, such as green being positive, etc. Make sure to always request a technical sheet from your supplier when purchasing the load cell for building a digital scale.
Step 5: Load Cell to Amplifier
The HX711 is a precision 24-bit analog-to-digital converter designed for scales and industrial control applications to interface directly with a bridge sensor.
It is specially designed to amplify the signals from cells and report them to another microcontroller. ADC for load cell is a 24-bit A / D converter designed specifically for the load cell. It contains a low noise program with an optional gain of 128, 64 as well as 32 bit.
The chip combines a synchronized power supply which further provides the rapid response, high integration, and durable protection against interference advantages to the user.
Also, with the connector and the screw terminal, it becomes easy to connect the load cell and the microcontroller, as there no soldering is required in the connection. You can also create your own load cell system, if needed.
Hence, you can use the HX711 amplifier and attach the wires to the appropriate pins on it. You can use the HX711 as it has 2 inputs, i.e. A and B, each with diverse amplifier gains adaptable by a computer programming.
But note that the device you are going to use should fit the explanation of the type of signal conditioning appliance that has a filter, amplifier, and ADC integrated mutually on a single chip.
Therefore, the connection between the HX711 and the load cell is as follows:
- Red wire / Positive supply = E +
- Black wire / Positive output = A +
- Green wire / Negative output = A-
- White wire / Negative supply = E-
Step 6: Connecting the amplifier to the microcontroller
Once you successfully connect the amplifier and the HX711 connects to the Arduino, as follow:
- VCC – 5V power supply
- CLK – D2
- GND – GND
- DOUT – D3
Step 7: Coding
After the successful establishment of the hardware connections, you can download the program code to the MCU from a PC. Also, the code and the process have two subcategories, i.e. the weighing code and the calibration code.
You can download the basic sketch and the working code for learning purposes of the arduino-based digital scale as well as can extend this code as per your convenience or need.
Step 8: Test the display

If you need to check your screen, connect it to Arduino and check on the Weighing Indicators display which should count from 0 to 999.
Note one thing that while powering it up, make sure that no weight is kept on the plate as this will cause false readings. Turn it on first, and then put the weight you want to measure.
Step 9: Complete
So now you’ve got yourself a weighing machine that’s pretty accurate and more than enough for hobbies.
Final words
The digital weight scale is an up to date machine that works on some electronic chipsets and helps us to know the exact weight of the things. In addition, the digital weighing machine is more interactive for users, as it comes with various other features such as temperature, body weight, percentage of fat, etc.
However, if you want to build your own digital scale, follow the above-mentioned DIY steps. You can also use the digital scale kit to measure the weight as it contains all the necessary parts and instructions for building a differential amplifier for the load cell sensor. But you will still need a little understanding of basic electronics and computer programming. You can take the guidance and help of a professional or engineer to understand the basics and work on your DIY weighing scale. Following these steps can help you to make your own weighing scale at home.

HEY ! I’m Nil (Founder of OnlineDrifts.com), Digital Marketer, Affiliate Marketer and a blogger writing about blogging tips, SEO, Tech Tips etc.